Router Configuration in Cisco Packet Tracer
We already have learned to configure Router in the previous class.
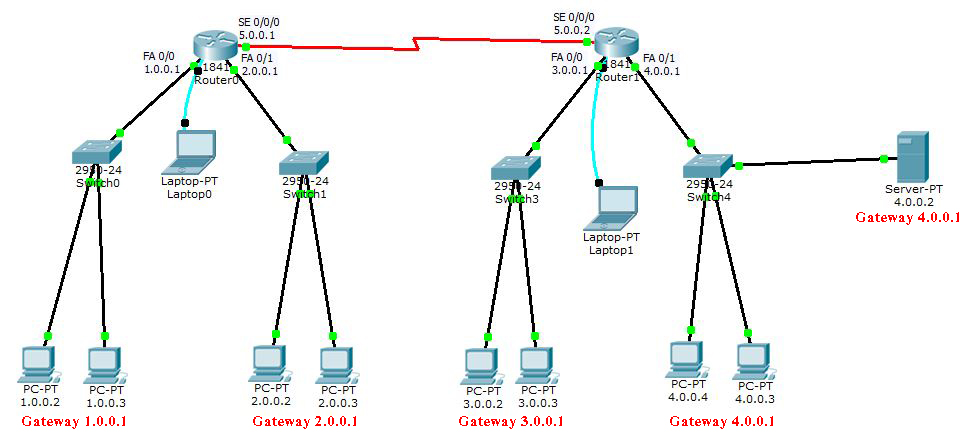
Now we are going to configure two Routers and both the Routers will be connected with each other in order to share data between different networks.
Routers have two ports Fa0/0 and Fa0/1 by default;
So each of those two ports will be connected to a separate network; therefore two Routers will have four separate networks but to connect both the Router we need extra port in each of the two Routers.
We connect Serial port in both the Routers to add extra ports and before connecting we have powered off the Router; after installing the port again we powered on the Router; so that we can connect both the Routers with each other.
Now both the Routers are connected through another network; so we have now five separate networks in this setup.
The IP Addresses that will be assigned to the First Router Fa0/0 port is 1.0.0.1.
The IP Addresses that will be assigned to the First Router Fa0/1 port is 2.0.0.1.
The IP Addresses that will be assigned to the First Router Se0/0/0 port is 5.0.0.1.
The IP Addresses that will be assigned to the Second Router Fa0/0 port is 3.0.0.1.
The IP Addresses that will be assigned to the Second Router Fa0/1 port is 4.0.0.1.
The IP Addresses that will be assigned to the Second Router Se0/0/0 port is 5.0.0.2.
So the new serial port has to be installed in both Routers and for connecting both the Routers through the Serial ports we will use DCE Serial Cable that we can find under the connection tab in the bottom left corner of the cisco interface.
We should not forget to apply the Clock Rate 64000 as parameter value command during the configuration of Router serial port; one side of the Serial Cable is DCE and the other side is Non DCE; so we will apply only in the DCE interface that in only in the first Router Se0/0/0 port.
The IP Addresses of the Routers ports will be used as the gateway for the computers; those are connected to the corresponding network.
Let us configure the first Router;
Continue with configuration dialog? [yes/no]: no
Router>enable
Router#configure terminal
Router(config)#interface fastEthernet 0/0
Router(config-if)#ip address 1.0.0.1 255.0.0.0
Router(config-if)#no shutdown
Router(config-if)#exit
Router(config)#interface fastEthernet 0/1
Router(config-if)#ip address 2.0.0.1 255.0.0.0
Router(config-if)#no shutdown
Router(config-if)#exit
Router(config)#interface serial 0/0/0
Router(config-if)#ip address 5.0.0.1 255.0.0.0
Router(config-if)#no shutdown
Router(config-if)#clock rate 64000
Router(config-if)#exit
Router(config)#exit
Router#write
Building configuration...
[OK]
Router#show ip route
C 1.0.0.0/8 is directly connected, FastEthernet0/0
C 2.0.0.0/8 is directly connected, FastEthernet0/1
C 5.0.0.0/8 is directly connected, Serial0/0/0
Router#exit
Router>
Let us configure the second Router;
Continue with configuration dialog? [yes/no]: no
Router>enable
Router#configure terminal
Router(config)#interface fastEthernet 0/0
Router(config-if)#ip address 3.0.0.1 255.0.0.0
Router(config-if)#no shutdown
Router(config-if)#exit
Router(config)#interface fastEthernet 0/1
Router(config-if)#ip address 4.0.0.1 255.0.0.0
Router(config-if)#no shutdown
Router(config-if)#exit
Router(config)#interface serial 0/0/0
Router(config-if)#ip address 5.0.0.2 255.0.0.0
Router(config-if)#no shutdown
Router(config-if)#exit
Router(config)#exit
Router#write
Building configuration...
[OK]
Router#show ip route
C 3.0.0.0/8 is directly connected, FastEthernet0/0
C 4.0.0.0/8 is directly connected, FastEthernet0/1
C 5.0.0.0/8 is directly connected, Serial0/0/0
Now we will apply the Router RIP protocol to the first Router; so that it can identify the second Router and it can recognize all IP Addresses of the adjacent Routers.
Router>enable
Router#configure terminal
Router(config)#router rip
Router(config-router)#network 1.0.0.1
Router(config-router)#network 2.0.0.1
Router(config-router)#network 3.0.0.1
Router(config-router)#network 4.0.0.1
Router(config-router)#network 5.0.0.1
Router(config-router)#network 5.0.0.2
Router(config-router)#exit
Router(config)#exit
Router#write
Building configuration...
[OK]
Router#exit
Router>
Now we will apply the Router RIP protocol to the second Router; so that it can identify the first Router and it can recognize all IP Addresses of the adjacent Routers.
Router>enable
Router#configure terminal
Router(config)#router rip
Router(config-router)#network 1.0.0.1
Router(config-router)#network 2.0.0.1
Router(config-router)#network 3.0.0.1
Router(config-router)#network 4.0.0.1
Router(config-router)#network 5.0.0.1
Router(config-router)#network 5.0.0.2
Router(config-router)#exit
Router(config)#exit
Router#write
Building configuration...
[OK]
Router#exit
Router>
Now send data packets between all connected computers; the first packet will fail for the newly connected node but after that all computers connected in different networks can send data packets between each other through the gateway of the Router.
We will add the DHCP server to the switch that is connected to the Fa0/1 port of second Router.
Therefore the DHCP server will also have a static IP Address of same network; so that it can be recognized in the network and all computers which are connected to the switch under same network will obtain IP Addresses automatically from the DHCP server.
The IP Address of second Router Fa0/1 port is 4.0.0.1 which will be used as the gateway for all the computers and server connected to the network; DHCP server IP Address will be set to 4.0.0.2.
All connected computers will automatically obtain IP Addresses from the DHCP server that is starting from the range 4.0.0.3 because 4.0.0.2 is set to DHCP server static IP Address and 4.0.0.1 is assigned to the Router ports; that will be used as the gateway for the network.
Router Configure Command Step by Step Router Configuration Using Packet Tracer Router Configuration Using Cisco Packet Tracer Router Configuration in Cisco Packet Tracer Router Configuration Commands Step by Step in Packet Tracer Router Configuration Commands Step by Step Router Configuration Commands How to Connect PC to Router in Cisco Packet Tracer How to Configure Router in Packet Tracer How to Configure IP Address on Router in Packet Tracer Basic Router Commands Router Configure Command Step by Step Router Configuration Using Packet Tracer Router Configuration Using Cisco Packet Tracer Router Configuration in Cisco Packet Tracer Router Configuration Commands Step by Step in Packet Tracer Router Configuration Commands Step by Step Router Configuration Commands How to Connect PC to Router in Cisco Packet Tracer How to Configure Router in Packet Tracer How to Configure IP Address on Router in Packet Tracer Basic Router Commands Router Configure Command Step by Step Router Configuration Using Packet Tracer Router Configuration Using Cisco Packet Tracer Router Configuration in Cisco Packet Tracer Router Configuration Commands Step by Step in Packet Tracer Router Configuration Commands Step by Step Router Configuration Commands How to Connect PC to Router in Cisco Packet Tracer How to Configure Router in Packet Tracer How to Configure IP Address on Router in Packet Tracer Basic Router Commands