VLAN Configuration in Cisco Packet Tracer (Part-II)
In the previous class we have configured a VLAN in a single setup.
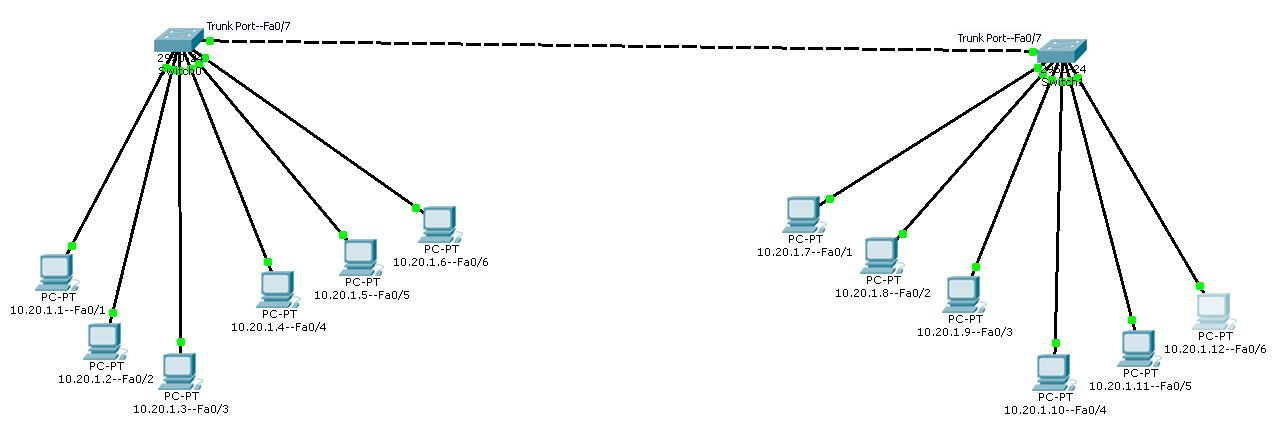
In this class we will create two separate setup of computers and each of those two setup will have a manage switch.
Now we have to write code and manage both switches separately.
So we will create the VLAN Student and the VLAN Teacher in both switches separately.
After creating VLANs; we will allot three ports to each VLAN and rest of the ports will be left with the Default VLAN.
We know that computers cannot communicate between separate VLANs; there are three VLANs in each switch; so we need a single port in both switches through which data can be passed of different VLAN; therefore to send data from one switch to another switch we need to create a special port in both switches; who will be the member of all VLANs so that it can send data of all VLANs from one switch to another switch.
What is the purpose of creating two separate setup having same VLANs in each of those?
Let us understand the requirements;
In an organization there can be same two or more departments in separate floors of a same building or sometimes in separate adjustment building.
How will user of same department share data with each other while there are sitting in separate floors of a building?
It is also to be ensured that data of one department will not allowed to be shared with other departments.
Therefore to implement this mechanism; we need separate setup and each of those setup; a manage switch is required for configuring VLANs.
Let us configure the first switch;
Follow the steps;
Open laptop interface first;
Choose the Terminal option;
Window will appear;
keep all the given parameters same as it is there;
Click OK button;
Now terminal window will appear for writing code;
Switch>enable
Switch#show vlan
| VLAN | Name | Status | Port |
|---|---|---|---|
| 1 | Default | Active |
Fa0/1, Fa0/2, Fa0/3, Fa0/4 Fa0/5, Fa0/6, Fa0/7, Fa0/8 Fa0/9, Fa0/10, Fa0/11, Fa0/12 Fa0/13, Fa0/14, Fa0/15, Fa0/16 Fa0/17, Fa0/18, Fa0/19, Fa0/20 Fa0/21, Fa0/22, Fa0/23, Fa0/24 |
Switch#configure terminal
Switch(config)#vlan 2
Switch(config-vlan)#name Student
Switch(config-vlan)#exit
Switch(config)#vlan 3
Switch(config-vlan)#name Teacher
Switch(config-vlan)#exit
Switch(config)#interface fastEthernet 0/1
Switch(config-if)#switchport mode access
Switch(config-if)#switchport access vlan 2
Switch(config-if)#exit
Switch(config)#interface fastEthernet 0/2
Switch(config-if)#switchport mode access
Switch(config-if)#switchport access vlan 2
Switch(config-if)#exit
Switch(config)#interface fastEthernet 0/3
Switch(config-if)#switchport mode access
Switch(config-if)#switchport access vlan 2
Switch(config-if)#exit
Switch(config)#interface fastEthernet 0/4
Switch(config-if)#switchport mode access
Switch(config-if)#switchport access vlan 3
Switch(config-if)#exit
Switch(config)#interface fastEthernet 0/5
Switch(config-if)#switchport mode access
Switch(config-if)#switchport access vlan 3
Switch(config-if)#exit
Switch(config)#interface fastEthernet 0/6
Switch(config-if)#switchport mode access
Switch(config-if)#switchport access vlan 3
Switch(config-if)#exit
Switch(config)#interface fastEthernet 0/7
Switch(config-if)#switchport mode access
Switch(config-if)#switchport mode trunk
Switch(config-if)#exit
Switch(config)#exit
Switch#write
Switch#show vlan
| VLAN | Name | Status | Port |
|---|---|---|---|
| 1 | Default | Active |
Fa0/8, Fa0/9, Fa0/10 Fa0/11, Fa0/12, Fa0/13, Fa0/14 Fa0/15, Fa0/16, Fa0/17, Fa0/18 Fa0/19, Fa0/20, Fa0/21, Fa0/22 Fa0/23, Fa0/24 |
| 2 | Student | Active | Fa0/1, Fa0/2, Fa0/3 |
| 3 | Teacher | Active | Fa0/4, Fa0/5, Fa0/6 |
Switch#exit
Switch>
Now there are three logical workstations; those are Default, Student and Teacher.
In the Default VLAN there are 17 ports assigned to it; previously there were all 24 ports allotted before we have assigned 6 ports under separate two VLANs and 1 port to trunk.
Trunk port is the friend and member of all VLANs; so through that port all VLANs can send and receive data packets.
Under the Student VLAN; we have assigned 3 ports Fa0/1, Fa0/2 and Fa0/3.
Under the Teacher VLAN; we have also assigned 3 ports Fa0/4, Fa0/5 and Fa0/6.
Port Fa0/7 is converted to trunk.
Now all the computers connected in different VLANs can send and receive local data only within same VLAN but not between separate VLANs; except the trunk port that is Fa0/7 which can be used for sending and receiving data from any VLANs.
Let us configure the Second switch;
Follow the steps;
Open laptop interface connected to the second switch;
Choose the Terminal option;
Window will appear;
keep all the given parameters same as it is there;
Click OK button;
Now terminal window will appear for writing code;
Switch>enable
Switch#show vlan
| VLAN | Name | Status | Port |
|---|---|---|---|
| 1 | Default | Active |
Fa0/1, Fa0/2, Fa0/3, Fa0/4 Fa0/5, Fa0/6, Fa0/7, Fa0/8 Fa0/9, Fa0/10, Fa0/11, Fa0/12 Fa0/13, Fa0/14, Fa0/15, Fa0/16 Fa0/17, Fa0/18, Fa0/19, Fa0/20 Fa0/21, Fa0/22, Fa0/23, Fa0/24 |
Switch#configure terminal
Switch(config)#vlan 2
Switch(config-vlan)#name Student
Switch(config-vlan)#exit
Switch(config)#vlan 3
Switch(config-vlan)#name Teacher
Switch(config-vlan)#exit
Switch(config)#interface fastEthernet 0/1
Switch(config-if)#switchport mode access
Switch(config-if)#switchport access vlan 2
Switch(config-if)#exit
Switch(config)#interface fastEthernet 0/2
Switch(config-if)#switchport mode access
Switch(config-if)#switchport access vlan 2
Switch(config-if)#exit
Switch(config)#interface fastEthernet 0/3
Switch(config-if)#switchport mode access
Switch(config-if)#switchport access vlan 2
Switch(config-if)#exit
Switch(config)#interface fastEthernet 0/4
Switch(config-if)#switchport mode access
Switch(config-if)#switchport access vlan 3
Switch(config-if)#exit
Switch(config)#interface fastEthernet 0/5
Switch(config-if)#switchport mode access
Switch(config-if)#switchport access vlan 3
Switch(config-if)#exit
Switch(config)#interface fastEthernet 0/6
Switch(config-if)#switchport mode access
Switch(config-if)#switchport access vlan 3
Switch(config-if)#exit
Switch(config)#interface fastEthernet 0/7
Switch(config-if)#switchport mode access
Switch(config-if)#switchport mode trunk
Switch(config-if)#exit
Switch(config)#exit
Switch#write
Switch#show vlan
| VLAN | Name | Status | Port |
|---|---|---|---|
| 1 | Default | Active |
Fa0/8, Fa0/9, Fa0/10 Fa0/11, Fa0/12, Fa0/13, Fa0/14 Fa0/15, Fa0/16, Fa0/17, Fa0/18 Fa0/19, Fa0/20, Fa0/21, Fa0/22 Fa0/23, Fa0/24 |
| 2 | Student | Active | Fa0/1, Fa0/2, Fa0/3 |
| 3 | Teacher | Active | Fa0/4, Fa0/5, Fa0/6 |
Switch#exit
Switch>
Now there are three logical workstations; those are Default, Student and Teacher.
In the Default VLAN there are 17 ports assigned to it; previously there were all 24 ports allotted before we have assigned 6 ports under separate two VLANs and 1 port to trunk.
Trunk port is the friend and member of all VLANs; so through that port all VLANs can send and receive data packets.
Under the Student VLAN; we have assigned 3 ports Fa0/1, Fa0/2 and Fa0/3.
Under the Teacher VLAN; we have also assigned 3 ports Fa0/4, Fa0/5 and Fa0/6.
Port Fa0/7 is converted to trunk.
Now all the computers connected in different VLANs can send and receive local data only within same VLAN but not between separate VLANs; except the trunk port that is Fa0/7 which can be used for sending and receiving data from any VLANs.
Therefore Fa0/7 port of both switches can communicate with any VLAN; so we will connect a straight copper wire to both the Fa0/7 ports of two switches in order to send and receive data packets between two separate setups.
So now Default VLAN members of one switch can send data to the Default VLAN members of other switch, Student VLAN members of one switch can send data to the Student VLAN members of other switch and Teacher VLAN members of one switch can send data to Teacher VLAN members of other switch through the Fa0/7 port; which is friend of all VLANs.
VLAN Configuration in Cisco Packet Tracer What is VLAN in Networking What is the Importance of VLANs in a Switched Network VLAN Configuration Step by Step in Packet Tracer VLAN Configuration Step by Step Command PDF VLAN Commands in Cisco Packet Tracer How to Configure VLAN on Cisco Switch Step By Step How to Configure VLAN in Switch How to Configure VLAN in Cisco Packet Tracer What is VLAN in Networking What is the Importance of VLANs in a Switched Network VLAN Configuration Step by Step in Packet Tracer VLAN Configuration Step by Step Command PDF VLAN Commands in Cisco Packet Tracer How to Configure VLAN on Cisco Switch Step By Step How to Configure VLAN in Switch How to Configure VLAN in Cisco Packet Tracer What is VLAN in Networking What is the Importance of VLANs in a Switched Network VLAN Configuration Step by Step in Packet Tracer VLAN Configuration Step by Step Command PDF VLAN Commands in Cisco Packet Tracer How to Configure VLAN on Cisco Switch Step By Step How to Configure VLAN in Switch How to Configure VLAN in Cisco Packet Tracer VLAN Configuration in Cisco Packet Tracer