VLAN Configuration on Cisco Router
We have learned to configure VLAN and Router in the previous classes.
Now in this class we will learn to configure the VLAN on a Router.
Why do we need to do so?
Let us understand that VLAN separates single physical workstation into logical two or more workstations in order to restrict access of local system data of different subdivided workstations depending on the requirement arises of an organization.
But they also have the requirements to access data over the Internet; so we also need to configure the VLAN setup in the Router so that they can access the Internet through the Router ports; Router has the default VLAN; if we create new VLAN for the switches then the same VLAN must be created in the Router ports to get matches with the switch VLAN.
Using VLAN we can also subdivide single port of the Router into multiple ports and in this way we can eliminate the cost of purchasing more Routers for creating separate networks.
Now let us first create two new VLAN in the switch;
Follow these steps after accessing the switch configuration interface through the screen of a computer or laptop which is connected to it with a console cable.
Switch>enable
Switch#configure terminal
Switch(config)#vlan 2
Switch(config-vlan)#name Student
Switch(config-vlan)#exit
Switch(config)#vlan 3
Switch(config-vlan)#name Teacher
Switch(config-vlan)#exit
Switch(config)#interface fastEthernet 0/1
Switch(config-if)#switchport mode access
Switch(config-if)#switchport access vlan 2
Switch(config-if)#exit
Switch(config)#interface fastEthernet 0/2
Switch(config-if)#switchport mode access
Switch(config-if)#switchport access vlan 2
Switch(config-if)#exit
Switch(config)#interface fastEthernet 0/3
Switch(config-if)#switchport mode access
Switch(config-if)#switchport access vlan 3
Switch(config-if)#exit
Switch(config)#interface fastEthernet 0/4
Switch(config-if)#switchport mode access
Switch(config-if)#switchport access vlan 3
Switch(config-if)#exit
Switch(config)#interface fastEthernet 0/5
Switch(config-if)#switchport mode access
Switch(config-if)#switchport mode trunk
Switch(config-if)#exit
Switch(config)#exit
Switch#write
Building configuration...
[OK]
Switch#show vlan
| VLAN | Name | Status | Port |
|---|---|---|---|
| 1 | Default | Active |
Fa0/6, Fa0/7, Fa0/8, Fa0/9 Fa0/10, Fa0/11, Fa0/12, Fa0/13 Fa0/14, Fa0/15, Fa0/16, Fa0/17 Fa0/18, Fa0/19, Fa0/20, Fa0/21 Fa0/22, Fa0/23, Fa0/24 |
| 2 | Student | Active | Fa0/1, Fa0/2 |
| 3 | Teacher | Active | Fa0/3, Fa0/4 |
Switch#exit
Switch>
Now let us configure the Router;
Open Router Interface through the Laptop Screen which is connected to it with a console cable.
Continue with configuration dialog? [yes/no]: no
Router>enable
Router#configure terminal
Router(config)#interface fastEthernet 0/0
Router(config-if)#no ip address
Router(config-if)#no shutdown
Router(config-if)#exit
Router(config)#interface fastEthernet 0/0.1
Router(config-subif)#encapsulation dot1Q 2
Router(config-subif)#ip address 1.0.0.1 255.0.0.0
Router(config-subif)#exit
Router(config)#interface fastEthernet 0/0.2
Router(config-subif)#encapsulation dot1Q 3
Router(config-subif)#ip address 2.0.0.1 255.0.0.0
Router(config-subif)#exit
Router(config)#exit
Router#write
Building configuration...
[OK]
Router#show ip route
C 1.0.0.0/8 is directly connected, FastEthernet0/0.1
C 2.0.0.0/8 is directly connected, FastEthernet0/0.2
Router#exit
Router>
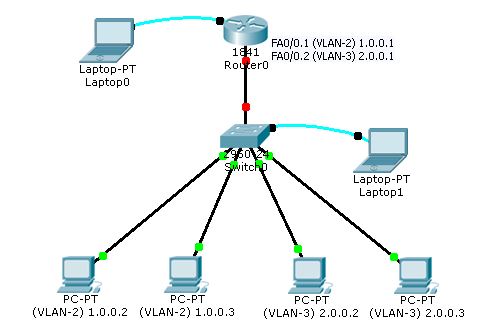
Therefore; by applying the above steps we have created two separate VLANs those are VLAN-2 as Student and VLAN-3 as Teacher in a switch.
Fa0/1 & Fa0/2 are allotted to VLAN-2 and Fa0/3 & Fa0/4 are allotted to VLAN-3; the Fa0/5 port is converted to the trunk port which is connected to the Router through port number Fa0/0.
We also have created same VLANs that are VLAN-2 and VLAN-3 in the Router port Fa0/0 after subdividing the same into two separate logical ports these are Fa0/0.1 and Fa0/0.2.
We have also assigned the IP Addressees to those ports as 1.0.0.1 to Fa0/0.1 and 2.0.0.1 to Fa0/0.2; which will be the gateway for the computers those will be connected to the corresponding networks.
VLAN Configuration on Router VLAN Configuration on Cisco Router VLAN Configuration in Router Router Configure Command Step by Step Router Configuration Using Packet Tracer Router Configuration Using Cisco Packet Tracer Router Configuration in Cisco Packet Tracer Router Configuration Commands Step by Step in Packet Tracer How to Configure VLAN on Router in Packet Tracer How to Configure VLAN on Cisco Switch Step By Step How to Configure Router in Packet Tracer Using CLI VLAN Configuration on Router VLAN Configuration on Cisco Router VLAN Configuration in Router Router Configure Command Step by Step Router Configuration Using Packet Tracer Router Configuration Using Cisco Packet Tracer Router Configuration in Cisco Packet Tracer Router Configuration Commands Step by Step in Packet Tracer How to Configure VLAN on Router in Packet Tracer How to Configure VLAN on Cisco Switch Step By Step How to Configure Router in Packet Tracer Using CLI VLAN Configuration on Router VLAN Configuration on Cisco Router VLAN Configuration in Router Router Configure Command Step by Step Router Configuration Using Packet Tracer Router Configuration Using Cisco Packet Tracer Router Configuration in Cisco Packet Tracer Router Configuration Commands Step by Step in Packet Tracer How to Configure VLAN on Router in Packet Tracer How to Configure VLAN on Cisco Switch Step By Step How to Configure Router in Packet Tracer Using CLI