Telnet Configuration in Cisco Packet Tracer
In this class we are going to configure Telnet setup.
We know that Telnet let us to connect remote device over the TCP/IP network.
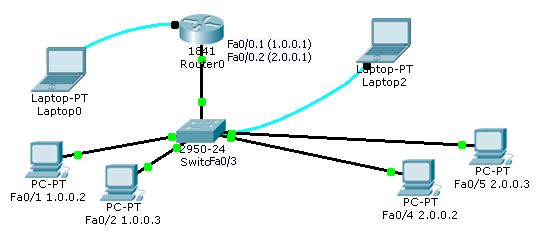
We will create network topology and in that topology from a host we are going to connect remote device.
Therefore in this way a client system can virtually access the server system without reaching near the server physically.
The client side system uses Telnet client application for sending request to the server and the server side system uses Telnet server application to respond the client request.
So; unless a remote device allow its accessibility through the Telnet server application over the network; any host cannot access the same.
Therefore the remote machine must allow its accessibility for the functioning of Telnet service.
In this class we are going to do three following steps:
Step-1: Configure Switch and create VLAN setup.
Step-2: Configure Router and assign IP Addresses through VLAN setup.
Step-3: Configure Telnet setup and access the remote device in a network.
While configuring the Switch; we will set a password for the switch permission; so that only the authorized client can access the Switch interface by typing the correct password.
While configuring the Telnet; we need to set the telnet password; so that client system will be given permission after providing correct Telnet password.
What is the benefit of using Telnet service?
To configure a device like Switch or Router; we need to be present there physically near the device to configure the same through a laptop or desktop screen which is connected to it with a console cable.
But using Telnet service; we can configure the same device sitting at any other location which can be a long distance away from the intended device.
We will just virtually access the interface of that device through a client computer screen; which is connected to the network.
Now; Let us configure the Switch;
Switch>enable
Switch#configure terminal
Switch(config)#enable password 123
Switch(config)# vlan 2
Switch(config)#name Student
Switch(config)#exit
Switch(config)# vlan 3
Switch(config)#name Teacher
Switch(config)#exit
Switch(config)#interface fastEthernet 0/1
Switch(config-if)#switchport mode access
Switch(config-if)#switchport access vlan 2
Switch(config-if)#exit
Switch(config)#interface fastEthernet 0/2
Switch(config-if)#switchport mode access
Switch(config-if)#switchport access vlan 2
Switch(config-if)#exit
Switch(config)#interface fastEthernet 0/3
Switch(config-if)#switchport mode access
Switch(config-if)#switchport access vlan 2
Switch(config-if)#exit
Switch(config)#interface fastEthernet 0/4
Switch(config-if)#switchport mode access
Switch(config-if)#switchport access vlan 3
Switch(config-if)#exit
Switch(config)#interface fastEthernet 0/5
Switch(config-if)#switchport mode access
Switch(config-if)#switchport access vlan 3
Switch(config-if)#exit
Switch(config)#exit
Switch#show vlan
| VLAN | Name | Status | Port |
|---|---|---|---|
| 1 | Default | Active |
Fa0/6, Fa0/7, Fa0/8, Fa0/9 Fa0/10, Fa0/11, Fa0/12, Fa0/13 Fa0/14, Fa0/15, Fa0/16, Fa0/17 Fa0/18, Fa0/19, Fa0/20, Fa0/21 Fa0/22, Fa0/23, Fa0/24 |
| 2 | Student | Active | Fa0/1, Fa0/2, Fa0/3 |
| 3 | Teacher | Active | Fa0/4, Fa0/5 |
Switch#configure terminal
Switch(config)#interface vlan 2
Switch(config-if)#ip address 1.0.0.10 255.0.0.0
Switch(config-if)#no shutdown
Switch(config-if)#exit
Switch(config)#line vty 0 15
Switch(config-line)#password 321
Switch(config-line)#login
Switch(config-line)#exit
Switch(config)#exit
Switch#write
Building configuration...
[OK]
Switch#exit
Switch>
Now we will access the switch from a remote system of same VLAN through the Command Prompt by Telnet service.
Let us open desktop of any computer which is connected to same VLAN.
Open the Command Prompt and type telnet followed by IP Address that we have set to the VLAN-2.
Let us now configure the Fa0/3 port and change it to trunk port by accessing the Switch interface from the remote system.
PC>telnet 1.0.0.10
Provide Telnet Password 321 (Password will not shown)
Password:
Switch>enable
Provide Switch Password 123 (Password will not shown)
Password:
Switch#show vlan
| VLAN | Name | Status | Port |
|---|---|---|---|
| 1 | Default | Active |
Fa0/6, Fa0/7, Fa0/8, Fa0/9 Fa0/10, Fa0/11, Fa0/12, Fa0/13 Fa0/14, Fa0/15, Fa0/16, Fa0/17 Fa0/18, Fa0/19, Fa0/20, Fa0/21 Fa0/22, Fa0/23, Fa0/24 |
| 2 | Student | Active | Fa0/1, Fa0/2, Fa0/3 |
| 3 | Teacher | Active | Fa0/4, Fa0/5 |
Switch#configure terminal
Switch(config)#interface fastEthernet 0/3
Switch(config-if)#switchport mode access
Switch(config-if)#switchport mode trunk
Switch(config-if)#exit
Switch(config)#exit
Switch#write
Building configuration...
[OK]
Switch#show vlan
| VLAN | Name | Status | Port |
|---|---|---|---|
| 1 | Default | Active |
Fa0/6, Fa0/7, Fa0/8, Fa0/9 Fa0/10, Fa0/11, Fa0/12, Fa0/13 Fa0/14, Fa0/15, Fa0/16, Fa0/17 Fa0/18, Fa0/19, Fa0/20, Fa0/21 Fa0/22, Fa0/23, Fa0/24 |
| 2 | Student | Active | Fa0/1, Fa0/2 |
| 3 | Teacher | Active | Fa0/4, Fa0/5 |
Switch#exit
Switch>
Therefore we can successfully configure the Switch from the remote desktop.
Let us configure the Router;
Router>enable
Router#configure terminal
Router(config)#interface fastEthernet 0/0
Router(config-if)#no ip address
Router(config-if)#no shutdown
Router(config-if)#exit
Router(config)#interface fastEthernet 0/0.1
Router(config-subif)#encapsulation dot1Q 2
Router(config-subif)#ip address 1.0.0.1 255.0.0.0
Router(config-subif)#exit
Router(config)#interface fastEthernet 0/0.2
Router(config-subif)#encapsulation dot1Q 3
Router(config-subif)#ip address 2.0.0.1 255.0.0.0
Router(config-subif)#exit
Router(config)#exit
Router#write
Building configuration...
[OK]
Router#show ip route
C 1.0.0.0/8 is directly connected, FastEthernet0/0.1
C 2.0.0.0/8 is directly connected, FastEthernet0/0.2
Router#exit
Router>
Now; we are going to allow the Router to get access over the network through Telnet service.
We should follow these following steps:
Router>enable
Router#configure terminal
Router(config)#enable password 456
Router(config)#line vty 0
Router(config-line)#password 654
Router(config-line)#login
Router(config-line)#exit
Router(config)#exit
Router#Write
Building configuration...
[OK]
Router#exit
Router>
Now let us access the Router from any remote computer other than the laptop that is connected to it with console cable.
Open the Command Prompt and type
PC>telnet 1.0.0.1
Now provide Telnet password of Router 654
Password:
Router>enable
Now provide Router password 456
Password:
Router#configure terminal
Router(config)#hostname Myrouter
Myrouter(config)#exit
Myrouter#exit
Myrouter>
Therefore we have successfully changed the Router name from a remote connected system.
TELNET Using Cisco Packet Tracer Telnet in Cisco Packet Tracer Telnet Configuration in Cisco Switch Telnet Configuration in Cisco Router Telnet Configuration in Cisco Packet Tracer How to Configure TELNET Username and Password in Cisco Router How to Configure TELNET Password on Cisco Switch How to Configure TELNET Password on Cisco Router How to Configure TELNET on Cisco Switch Packet Tracer How to Configure TELNET on Cisco Switch How to Configure TELNET on Cisco Router TELNET Using Cisco Packet Tracer Telnet in Cisco Packet Tracer Telnet Configuration in Cisco Switch Telnet Configuration in Cisco Router Telnet Configuration in Cisco Packet Tracer How to Configure TELNET Username and Password in Cisco Router How to Configure TELNET Password on Cisco Switch How to Configure TELNET Password on Cisco Router How to Configure TELNET on Cisco Switch Packet Tracer How to Configure TELNET on Cisco Switch How to Configure TELNET on Cisco Router TELNET Using Cisco Packet Tracer Telnet in Cisco Packet Tracer Telnet Configuration in Cisco Switch Telnet Configuration in Cisco Router Telnet Configuration in Cisco Packet Tracer How to Configure TELNET Username and Password in Cisco Router How to Configure TELNET Password on Cisco Switch How to Configure TELNET Password on Cisco Router How to Configure TELNET on Cisco Switch Packet Tracer How to Configure TELNET on Cisco Switch How to Configure TELNET on Cisco Router